Hospital Assembly
Objective: The Assembly is an editor’s first chronological arrangement of shots, chiefly used to assess coverage. Though hastily thrown together, professionals order their work for ease of collaboration. The assignment thus prioritizes project organization, file nomenclature, and the in/out/insert protocol over frame-accurate edits.
Submit: Show your Assembly Edit and Adobe workspace to the professor in class.
Assessment: Your individual pass/fail grade will be averaged with other quiz & assignment scores.
- On the server: Prepare project files.
-
- In your group’s server partition, locate (or, if necessary, create) a folder labeled Hospital YourLastName with subfolders as shown in this video.
- If necessary, download to the “video” subfolder: Hospital Footage (4K UHD) or Hospital Footage (low-rez for slower internet connections)
- If necessary, download the “project/documentation” subfolder: Hospital Script and Hospital Credits
- Start a new Hospital YourLastNameproject in Adobe Premiere. Switch to Adobe’s “Editing” workspace. Organize bins as shown in this video.
2. In Premiere: Import and divide footage into subclips.
-
- Use the Media Browser to import footage from your computer folders to the Adobe project bins.
- Using the icon view of the Project Window and the Source Monitor, scrub quickly through clips using the transport keys J, K, & L.
- Use the In, Out, and Make Subclip commands (in the Source Monitor Window) to divide each of the five raw shots by take into subclips.
- Customize the Project Window meta-data for comments and grading. Name, grade, and store the subclips in sub-bins for ease of collaboration.
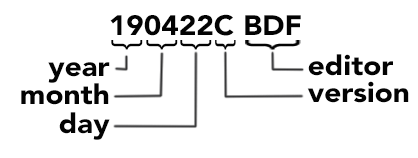
3. In the Editing Workspace: Create and properly label a new sequence as shown:

4. Use the In, Out, and Insert commands (in the Source Monitor Window) to prepare a broadcast-standard leader with slate (in the Timeline Window). Lock the leader tracks.
5. In the Project window: Duplicate and rename a new version of the sequence.
6. Referring to the storyboard or script, use the In, Out, and Insert commands (in the Source Monitor Window) to place clips in chronological order (in the Timeline Window). In this version of the edit, repeated lines are expected. At this point, speed is more important than precision. Keep video clips in the same timeline track to reduce Premiere’s demand on the computer’s CPU and RAM.
Film project work is cumulative. Please ask questions in class or meet with the professor during his office hours to keep problems with the Assembly Edit from snowballing into bigger challenges in the Rough Cut.
