The post-production workflow is cumulative. An editor can’t move forward with the assembly until the dailies have been properly merged. Thus, you should plan to show your professor two drafts of each assignment while there is still time to revise them. A single missed deadline tends to delay successive assignments, all of them incurring a costly late penalty. Maybe you’re not explicitly listed as a person of ultimate responsibility below; but the nature of group assessment makes it your business to actively aid those who are.
Server & Project Organization
Objective: The visual editor will (1) prepare the storyboard for use in post-production; and (2) organize bins, sequences, and footage within the Adobe Premiere project for efficient server-based editing.
Assessment: Pass/fail. The group grade will be averaged with other quiz & assignment scores.
- In an assigned post-production lab, label a 3-ring binder. Insert paper copies of the storyboard.
- On the server create a subfolder with this file path:
- On behalf of your crew, the editor will create a subfolder with this file path:
smb://anim-stor1 >> cinema >> studio >> project title >> 200423 Betta
- Inside, s/he will create the following subfolders:
- audio
- dialogue
- music
- sound effects
- documentation
- BTS
- paperwork
- promotional
- video
- project
- audio
- In Adobe Premiere Pro
-
- Create an Adobe Premiere project with the following bins: sequences, video, audio, graphics, merged footage, effects, and music.
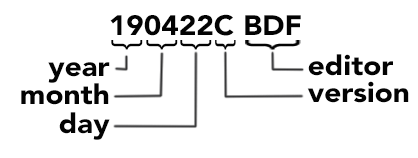
- Create a sequence with the following nomenclature: YYMMDD followed by the most recent version letter, a space, and the editor’s three initials, like this:
 Create a new sequence for each work session. Make sure the sequence settings conform to the footage settings.
 - Begin the first sequence with bars and tone, slate, and universal leader as specified here.
-
Dailies
Objective: During or immediately after the shoot, the visual editor will use the group’s footage log to synchronize and merge corresponding video and audio files. S/he will alert the director and producer to shots that are missing but would help advance the story. The visual editor will add a hard copy of the footage log to the project binder in the group’s assigned post-production lab.
Assessment: Pass/fail. The group grade will be averaged with other project scores.
Assembly
Objective: The visual editor will (1) trim and mark usable footage, (2) retire bad takes. The resulting footage (often multiple takes of the same shot) is placed in sequence and reviewed to insure basic coverage. Does the editor have all the necessary shots to make the film as shown in the storyboard?
Assessment: Pass/fail. The group grade will be averaged with other quiz & assignment scores.
- In the Adobe Premiere project:
- Duplicate and rename a new sequence.
- Audition merged clips in the source window. Mark them with “in” and “out” points.
- Move selected clip segments into targeted timeline tracks, stacking the shots as they appeared in the storyboard.
- On the server:
- Audition and upload three pieces of thematically appropriate royalty-free music to this project’s music subfolder on the server partition.
- On behalf of the group, the producer will upload the credits of your film as a .pdf to the “documentation” folder.
Rough
Assessment: Pass/fail. The group grade will be averaged with other quiz & assignment scores.
-
- Duplicate and rename a new sequence.
- Cut the film on dialogue as indicated by the storyboard.
- Trim the clips for pacing. Use at least two J- or L-cuts.
- Add temp music.
- Add credits.
Visual Lock
Objective: The rhythm of draft-and-revision leads visual editors here, to a locked version of the film which cannot increase or decrease in running time. From here on out, any changes in the visual track of the film wreak havoc on those who follow with work in the soundtrack.
Assessment: Pass/fail. The group grade will be averaged with other project scores.
-
- Duplicate and rename a new sequence.
- Solicit feedback, then produce a final cut of the film.
- Copy music from the server subfolder folder to the corresponding Adobe project bin.
- Label and organize the audio track for editing.
Graphics
Objective: Design elements of the title and credit sequences should unify the film with the poster and other promotional materials.
Assessment: A group grade will be averaged with other quiz & assignment scores.
Color
Objective: Color adjustment is an element of visual polish which frequently distinguish the professional from the amateur.
Assessment: A group grade will be averaged with other quiz & assignment scores.
The successful colorist will demonstrate competence in three areas (performed in this order):
- Basic color correction.
- Input LUT (Look Up Table)
- White Balance
- Temperature
- Tint
- Tone – as a shortcut, try PremierePro’s “auto” setting first.
- Exposure
- Contrast
- Highlights
- Shadows
- Whites
- Blacks
- Shot-matching. Make individual shots recorded under different lighting conditions look like they belong in the same scene.
- Broadcast-safe monitoring.
The colorist may also add more subjective, creative color grading, but should first present comparable photos or film stills as visual targets. The targets should be discussed in advance with the professor and the group’s key creatives.
